Wednesday, January 30, 2013

Old Stool

A few months ago I picked up this little stool for only $10 from Sonyas Stuff out in Pinson.  They do house clearances and have some amazing finds for cheaper than cheap. They never try and paint or fix up what they find so it's a great place to go if you're looking for a project. 

 
I wouldn't dream of painting the wood, but the beige top needed a bit of a makeover.  I hit up Joanns fabrics this weekend and picked out a striped fabric.  This was my first venture into upholstery and it went surprisingly well. It was as simple as measuring round the outside of the cushion, cutting the fabric about 2" wider around all sides, and stapling away.


A little Paul Smith-esque, perhaps??


I love how it turned out.


 Kate
xxx
 

Monday, January 28, 2013

Valentines

In the spirit of all things valentines, I thought I'd try something I've seen on Pinterest about a million times - met, married, live.

The idea is to cut out a map heart of the place you met, where you married and where you live.  I picked up this old school map from J&J Junk on my last visit, and printed out the silhouette of a heart.

 
The tricky thing was we met in London, so a road map of US, Canada and Mexico wasn't exactly going to reach that far.  I decided to get creative and used London Ontario instead.  Perfect!
 
 
I rummaged around my frame stash and found an old Aris frame I bought from Michaels when they were on clearance.  They are exactly like the Ikea Ribba frames but about a quarter of the price.  I must have bought about 20 of those frames, so annoying they don't stock them anymore.
 
The only thing was there were 4 spaces instead of the 3 I needed.  I decided to cut out a red heart to fill in the extra space.
 
 
Here it is up on the wall just inside the front door.
 
 
Kate
xxx
 

Friday, January 25, 2013

Scottish Is

Happy Burns Night to all my friends and family back home in Bonnie Scotland!  Robert Burns was a famous Scottish Poet (he wrote Auld Lang Syne) and his birthday (Jan 25th) is usually celebrated with a traditional Burns Supper of haggis, neeps and tatties, and usually too much to drink!

The Selkirk Grace always starts off the meal:

Some hae meat and canna eat,
And some wad eat that want it;
But we hae meat, and we can eat,
And sae let the Lord be thankit.

And while we're on a Scottish kick, I couldn't resist posting this clip:


In honour of Burns Night I'll be sitting down to a glass or two of overpriced Irn Bru!  If you're ever in Publix, keep an eye out for the fluorescent orange glow of Irn Bru (its usually in the teeny tiny Brit food section).  I won't even try and describe the flavour - you'll just have to try it.

 
Kate
xxx

Thursday, January 24, 2013

Feature

Today my DIY desk is being featured over at Knock Off Decor.  Beckie's site is jam packed with cheap ways to recreate expensive projects, you can't get much better than that!

Thanks Beckie!

 
Kate
xxx

Wednesday, January 23, 2013

Welcome home

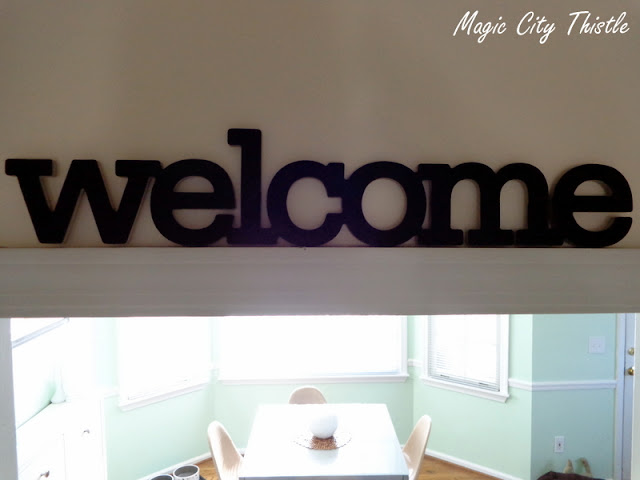
Who doesn't like a nice warm welcome when you visit someones house.  I was wandering round Hobby Lobby the other day, and spied this little gem for just $3 (all of their chipboard was 50% off).

I painted it plain black and popped it above the doorway at the end of the hallway.  I love the old school typewriterish (totally a word) font.
 
 
You see it as soon as you come in through the front door, and it goes perfectly with our Nessy print.  I'm loving how painting the hallway cream really opened up the space compared to the dark sludgy green it was before.

 
I have big plans for this hallway which may involve adding a stripe or two, or maybe a gallery wall??  

Kate
xxx


Sunday, January 20, 2013

Countertop Fraud

The last time I showed you our desk, I had crafted the desktop from cardboard and an old metal shelf (more on that HERE), but it was still looking very sad:


Thanks to some basic walnut look contact paper, the desktop was transformed into this:


It was surprisingly easy to stick on, and has a nice smooth finish.


You can see the metal shelf lip at the back of the desk, so the desktop doesn't slide around and is very sturdy.


Here is the desk area now with all of our accessories added.  Most of the items we already had (the stool was moved from being a side table in our living room, the lamp was an old thrift store find, the black 'in tray' was $2 from J&J Junk).


I did splash out $2 on the Michaels tulips and weekly planner:


I've been collecting these K's over the past few years:


The storage has been so helpful for organizing our important documents......


.......and my Better Homes & Gardens magazines.


The grey drawer organizers were from Homegoods and will hopefully prevent them from becoming junk drawers.


You can see how slimline the desk needed to be (one of the main reasons I couldn't buy new/used).


I'm so pleased with how it turned out - one step closer to organization.


New here, thanks for stopping by. You can stay connected with me through Bloglovin:
Follow on Bloglovin
Google Friend Connect (check bottom right in the side bar)
Or see my likes and loves on Pinterest
Follow Me on Pinterest
Kate
xxx

Friday, January 18, 2013

Desk phase 2

It's full steam ahead on the desk project.  I picked up 4 storage cubes at Michaels which put my flat-pack-putting-together skills to the test (more on that here).


I had the perfect space for the desk, a wall area next to the sofa.  The cubes are only 14" square, so the desk would be slimline, the perfect size for the space.

Here's Murph admiring my handy work, (or wondering what on earth I'm up to now!).


For the desktop I really wanted wood to contrast against the white cubes.  Ideally I would have used some wood we had leftover from another project, and stain it with some leftover stain, and seal it with some leftover sealer.  Unfortunately, we don't have any wood, or stain or sealer.  And we are on a major budget, so it was time to get creative and shop our house (ie rummage around to see what we already have).  I found lots of cardboard boxes and shelving and you can't get better than free!


I initially thought that a couple of sheets of thick cardboard might do the trick, but it was waaaay too flimsy, and wouldn't have held a cup of tea, let alone a laptop!  My next idea was to combine the cardboard with the shelving.  I started by cutting the cardboard the length and width I needed, and taping the shelving to the underneath.  It was all very technical :-)


Using a mixture of hot glue and packing tape, I sandwiched the second piece of cardboard so the metal shelving was covered on both sides by cardboard.  Just the lip was sticking out which would run along the back of the desk to help secure the desktop and prevent it from sliding.

I sealed all of the edges with some more tape.


I'm all for rustic, but even I draw the line at cardboard - could it look any more temporary!!


Check back on Monday for the big reveal - I guarantee you'll be surprised!  I've got a bit more styling to do and it'll be finished.
 
See the finished desk HERE

Kate
xxx

Wednesday, January 16, 2013

All Bar None

Until recently, the corner of our dining room was home to a small dark wood table  Unfortunately, I don't have a before pick because that sad little rickety table was out of here as fast as it's wonky spindle legs could carry it!

On a recent trip to one of my favorite flea malls (Bama Flea Mall), I picked up this amazing bar cart to take the tables place: 

 
It's in amazing condition, no chips to the glass or scratches in the gold.

It originally had 4 care home style wheels on the bottom that I managed to pry off as they didn't go at all with the faux bamboo modern gold finish and hexagonal shape.


I've seen lots of examples of amazing bar carts, these are some of my faves:

 
The Life Styled - I heart the paper straws


Kate
xxx
 
Find more Thrifty Finds HERE

Sunday, January 13, 2013

Dollar Store Ampersand Art

I really like the wood grain art I have seen popping up around the blogosphere recently, and was inspired to do my own take but on the cheap.  I mean really cheap.  I mean Dollar Store cheap!

What does Dollar Store have that is wood grain.........drawer liners of course!

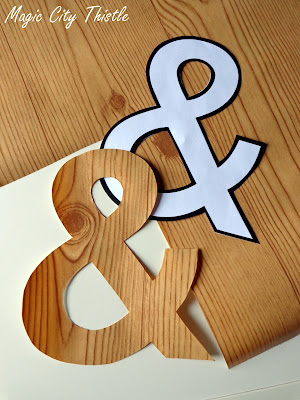
I whizzed round my local store and picked up these supplies.  I printed out the Ampersand sign in a variety of fonts (I'm slightly obsessed with "&" art at the mo. but this would look just as great with your initial).


(Side Note: how amazing are these Dollar Store 11x14 frames!  I picked up two but will be going back for more).

I cut out the paper sign, traced the outline onto my wood grain drawer liner and cut around it with my Exacto knife.  I made sure the piece I used had a nice wood knot to really highlight the grain.


As if wood grain paper for $1 wasn't amazing enough, it's sticky so is super easy to mount on whatever colour background you choose.  I went for black card that we already had.  I added a simple matte and this is how it looked.


So for $2 I have some funky new art and if I still need to line my drawers, there's plenty left!


New here, thanks for stopping by. You can stay connected with me through Bloglovin:
Follow on Bloglovin
Google Friend Connect (check bottom right in the side bar)
Or see my likes and loves on Pinterest
Follow Me on Pinterest
Kate
xxx
 

Friday, January 11, 2013

Bathroom Update

Our guest bathroom isn't the biggest bathroom in the world, but it's functional and has had a bit more botox since we last checked in on progress, here.  Not a full facelift, but definitely some botox.

This is a look at the before, floral shower curtain and all.


The view from the door (a window covering is high on the 2013 "to do" list).  We quickly painted over the orange and changed out the shower curtain for a white waffle.


We were lucky that the vanity was already white, so we just had to change out the hardware.


We took down the builder basic, no frame, mirror and added a new light fixture.  All quick easy fixes that make the space look much more modern.


A closer look at the new light fixture from Lowes.  The mirror is a dark grey (it looks a bit brown in this pic) from TJ Maxx.


The hubby has been holding on to this Pearl Jam pic since 2006, so it was time to frame it up:


 And a nice Ikea Grundtal towel bar to finish the look:


Kate
xxx